Adding a New Program Template
A Program Template is a master program you can create and save in your library to use again and again with different clients, saving you time and work. Also, once you assign a program template to a specific client, you can modify the copy of the program in that client’s account. Please remember that changes you make in a specific client’s program are NOT saved in your master Program Template library.

Creating or editing a workout or program can only be done on the desktop app.
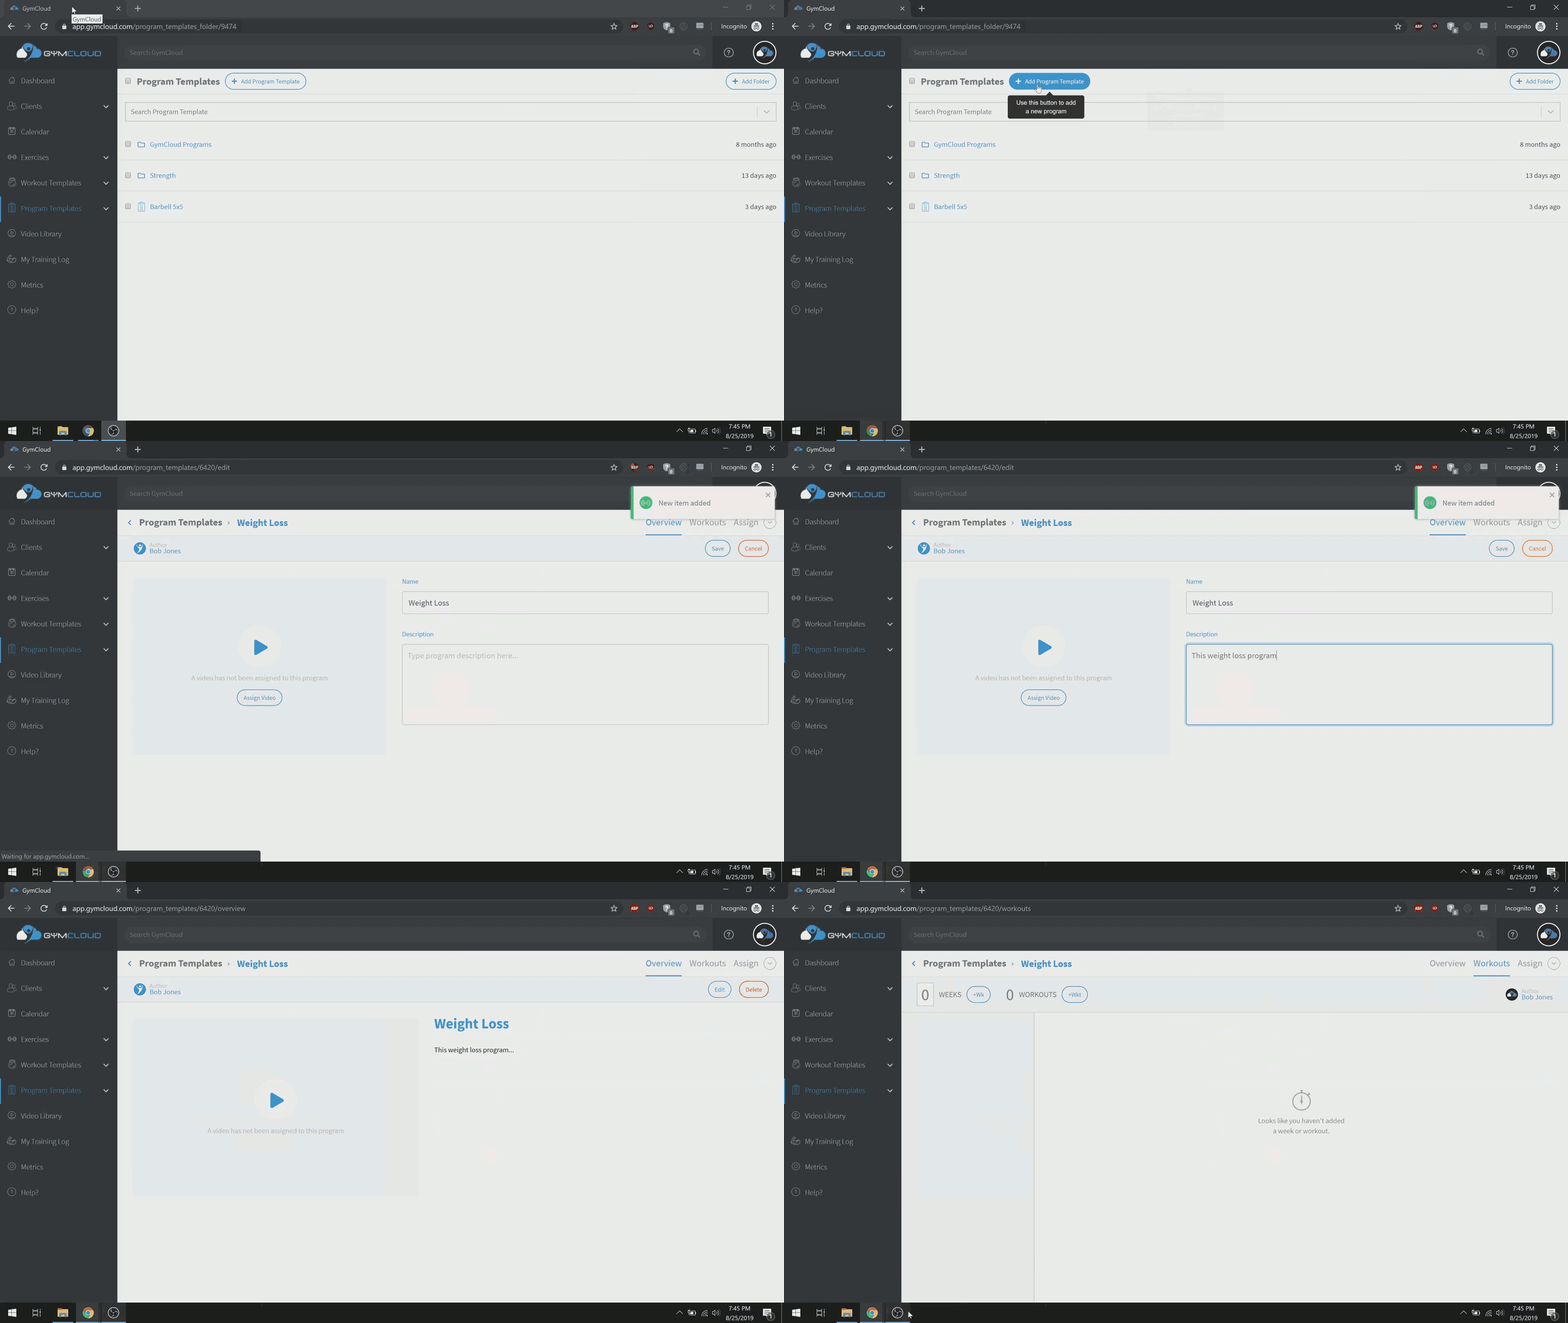
After logging in to your GymCloud account, you will be directed to the Dashboard page. You will see a list on the left side of the page. Click Program Templates.
Clicking Program Templates will redirect you to your Program List page, where you can see all the programs in your library. To create a new program, click the Add Program Template button at the top of the page.
Next, an Add Program Template pop-up box will appear. Type the name of your new program and click Add Program Template. (In this case, we are creating a "Weight Loss" program.)
Next, you will be directed to your Program Overview page. Here you can add a program description and add a program video if you wish.
Click Save when you are finished. You can click Edit if you wish to make changes
- Click the Workouts tab to begin building your program.
Adding and Managing Weeks

The first step in adding workouts to a program is to set the number of weeks the program will last. Then you will place workouts in the appropriate week(s).
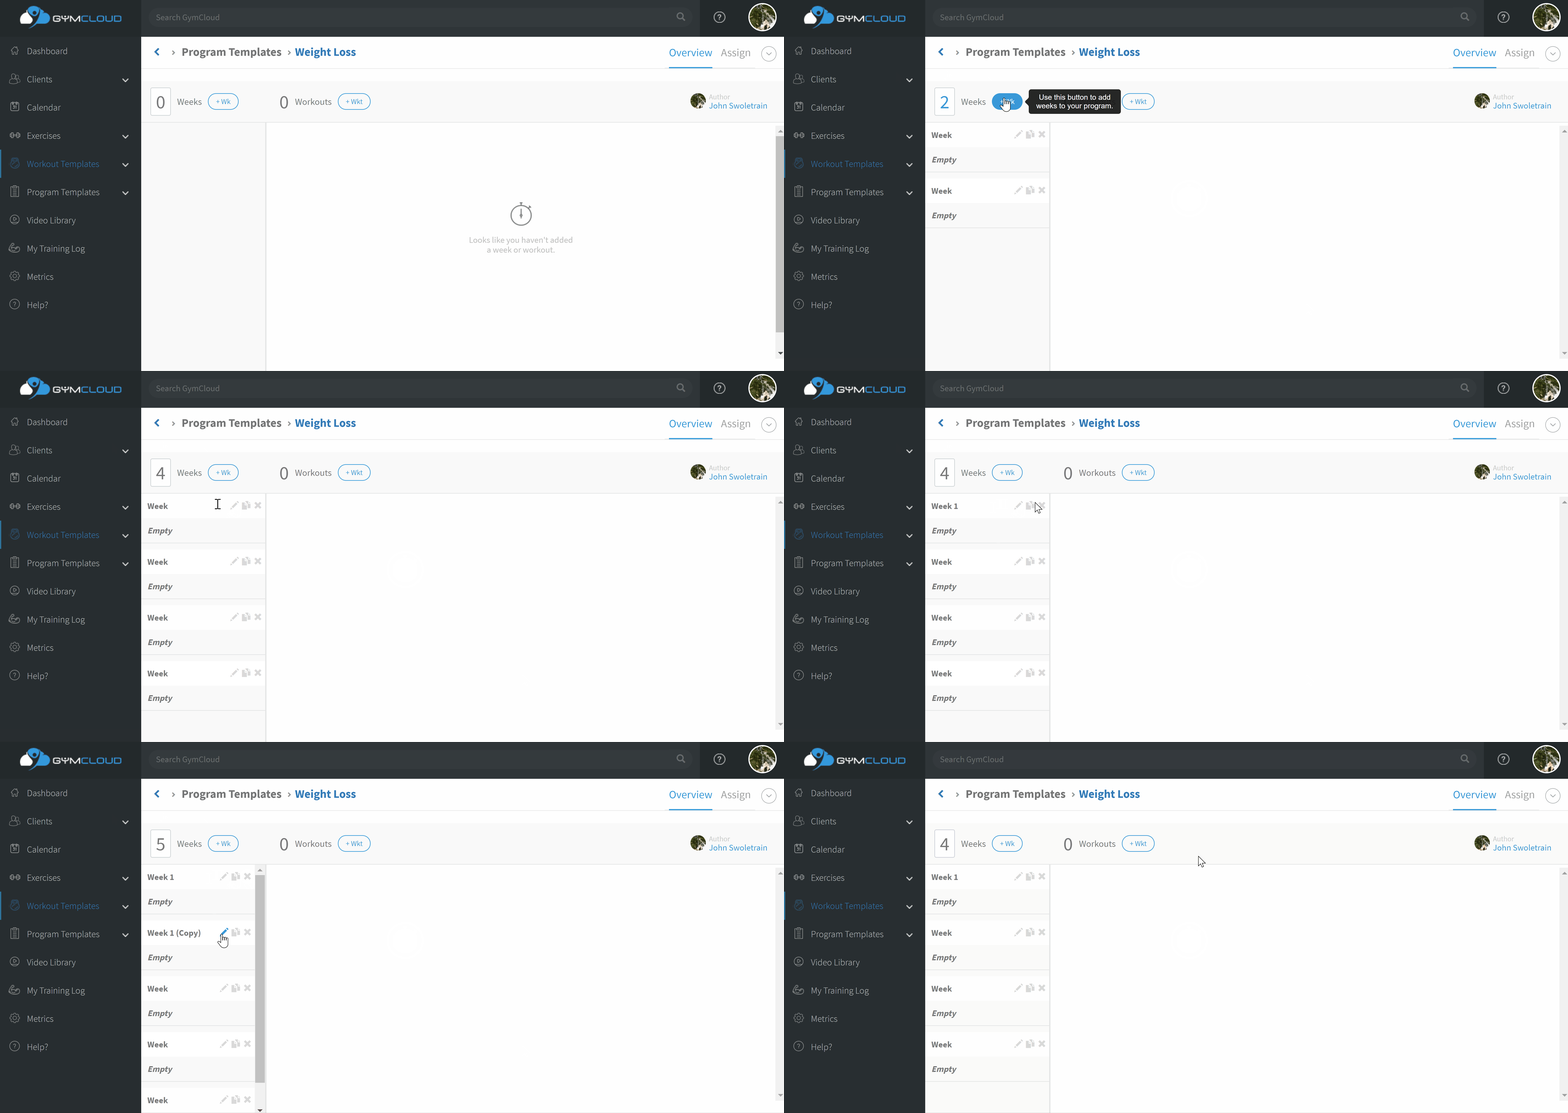
From your Program Overview page, add a week by hitting the +Wk button on the top-left of the page. You can add as many weeks as needed.
To edit the name of a week, click the Pen icon. After making your changes, hit your Enter button or click outside the text box to save those changes.
To Copy a week, click the Copy icon. The newly copied week, and any workouts it contains, will appear below the original week.
- To Delete a week, click the trashcan icon. A confirmation popup will appear. Click the Delete button to confirm your decision.
Adding Workouts

- From your Program Overview page, add a workout by hitting the +Wkt button on the top-left of the page.
- You can select a preexisting workout from your library or create a new workout on the spot by clicking +Add New from the list. (To learn how to build a new workout, click here: How to Build a Workout)
- You can Move workouts by using drag and drop on the blue up/down arrowson the left side of the Week/Workout list.
Duplicating or Deleting a Workout

- To Duplicate or Delete a workout, click the 3 Dot icon on the right side of the workout's name header.
- A list of options will appear. If you click Duplicate, the duplicated workout will appear at the bottom of the workouts for the current week.
- If you click Delete, a confirmation popup will appear. Confirm your choice by clicking Delete.
Renaming a Program or Program Workout

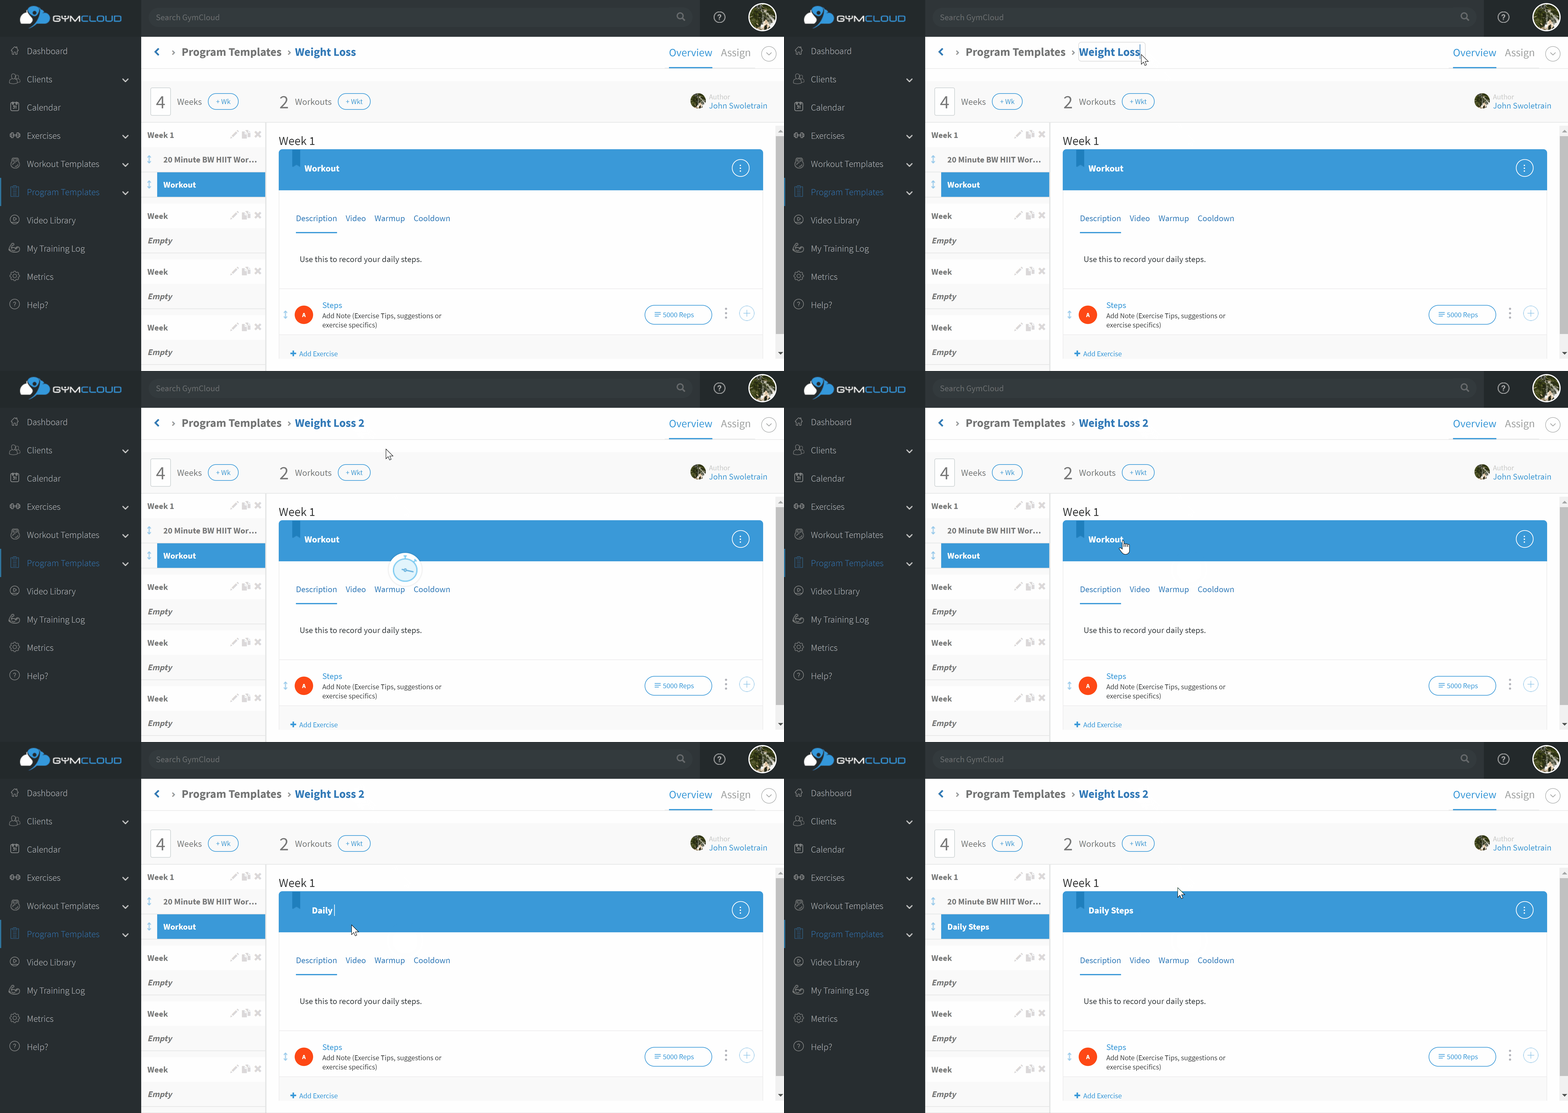
- To edit the name of the Program, click the current name in the address bar.
- Make any text changes you wish, then click outside the text field to save your changes.
- To edit the name of a Program Workout, click the current name in the workout's blue header.
- Make any text changes you wish, then click outside the text field to save your changes.
Saving a Program Workout to Your Workout Templates
- To Save a program workout to your Workout Templates, click the 3 Dot icon on the right side of the workout's name header.
- A list of options will appear. Click Save Workout.
- In the popup that appears, select a folder from your Workout Templates and then click Save.
Deleting a Program
- To Delete a program, click the caret icon in the upper right corner of the Program Overview page.
- Click Delete, then confirm your choice in the popup by clicking Delete.
- You will be returned to your main Program Templates folder.
Creating a Unique Program for a Client

- To create a unique program for a client without using a Template, navigate to Clients > {name of client} > Programs.
- Next, click the + Add Program button.
- Enter the name of the new program in the popup that appears and click “Create”. This creates a blank template and adds it to your client’s list of programs.
- Click the link to the program when it appears in the client's list of assigned programs.
- Read How to Modify an Assigned Program or Workout if you need further instructions.